How to create a java command line tool that is (1) easy to install (2) as small as possible (3) and does not interfere with a previously installed jvm on the host?
Here is my take
- Create an executable ‚fat jar‘
- Create a minimal jvm to run the fat jar
- Define a proper version number
- Package everything together to a
.deb package
- Provide the .deb package via an online repository
All snippes were taken from https://github.com/jschnasse/oi
The oi command line app is a very simple conversion tool to transform structured formats from one into another.
Create an executable ‚fat jar‘
I use the maven-assembly-plugin for this. Here is the relevant section from my pom.xml.
<plugin>
        <artifactId>maven-assembly-plugin</artifactId>
        <executions>
          <execution>
            <phase>package</phase>
            <goals>
              <goal>single</goal>
            </goals>
          </execution>
        </executions>
        <configuration>
          <finalName>oi</finalName>
          <descriptorRefs>
            <descriptorRef>jar-with-dependencies</descriptorRef>
          </descriptorRefs>
          <archive>
            <manifest>
              <mainClass>org.schnasse.oi.main.Main</mainClass>
            </manifest>
            <manifestEntries>
              <Automatic-Module-Name>org.schnasse.oi</Automatic-Module-Name>
            </manifestEntries>
          </archive>
          <appendAssemblyId>false</appendAssemblyId>
        </configuration>
      </plugin>
The most important configuration entry is the path to the <mainClass> . The entry points to a java class that must define a main method.
It also is important to define a fixed <finalName>. We don’t want to create artifacts with version numbers in it. The versioning is done elsewhere. Our build process should just spit out an executable at a predictable location.
The mvn package command will now create a fat jar under target/oi.jar.
Create a minimal jvm to run the ‚fat jar‘
The created jar can be executed as java -jar target/oi.jar. This is already an important milestone since you can now use the app on your own development pc. To make it a bit handier put the actual call into a script and copy it to /usr/bin/oi in order to make it accessible for all users on the development machine. Also you can provide the oi.jar at a more global location, e.g. /usr/lib.
This could be the content of /usr/bin/oi
java -jar /usr/lib/oi.jar $@
Use $@ to pass parameters from command line to the actual java app.
More on this will be explained in the ‚Package everything together‘ section.
The next step is to make the program executable on other machines. Since the application depends on the existence of the java interpreter we have to find a way to either ship java together with our little oi tool or to ask the user/user’s computer to install it in advance.
Both approaches are feasible. I decided to ship java together with my tool for the following reasons (1) The tool should be as self contained as possible (2) The installation of the tool should not interfere with other java based packages. (3) I want to be free to update to new jvm versions at my own speed, therefore I want support only one single jvm version at every state of development.
Today java distributions come with a tool named jlink. The jlinktool can be used to create minimal jvms. This will look like:
jlink \
    --add-modules java.base,java.naming,java.xml \
    --verbose \
    --strip-debug \
    --compress=1 \
    --no-header-files \
    --no-man-pages \
    --output /opt/jvm_for_oi
The result is a minimal jvm only containing the modules java.base,java.naming,java.xml under /opt/jvm_for_oi. The idea is now to provide this jvm together with our app. But to become a bit more independent from the configuration of my development machine I want to guarantee that my tool is served always with a well defined jvm version and not just with the version I have installed at my development machine. To create a well defined build environment I will use docker. With docker I can create a minimal jvm on the basis of a predefined openJDK version. And here is how it works.
1. Based on the code above we can create a file named Dockerfile.build to create the jvm based on the openJdk-12.0.1_12.
FROM adoptopenjdk/openjdk12:jdk-12.0.1_12
RUN jlink \
    --add-modules java.base,java.naming,java.xml \
    --verbose \
    --strip-debug \
    --compress 2 \
    --no-header-files \
    --no-man-pages \
    --output /opt/jvm_for_oi
We will use this docker definition just to create the jvm and copy it to our development environment. The docker image can be deleted directly afterwards.
docker build -t adopt_jdk_image -f Dockerfile.build .
docker create --name adopt_jdk_container adopt_jdk_image
docker cp adopt_jdk_container:/opt/jvm_for_oi /usr/share/jvm_for_oi
docker rm adopt_jdk_container
The resulting jvm can be found under /usr/share/jvm_for_oi.
This again is a very important milestone. You can now edit your startscript at /usr/bin/oi and use the generated jvm instead of your preinstalled java version. This will make the execution of the app independent of the globally installed java version and therefor more reliable.
/usr/share/jvm_for_oi/bin/java -jar /usr/lib/oi.jar $@
In my project configuration the inclusion of the minimal jvm increases the size of the .deb package by ~10MB. On the target system the jvm takes ~45MB extra space. In my former setup I configured openJDK-11 as dependency in the Debian package which consumes roughly ~80MB of extra space if newly installed.
Define a proper version number
Since oi is a java app built with maven I use the typical semantic versioning scheme which consists of three numbers (1) a major, (2) a minor, (3 ) and a patch number divided by dots. Example given, a version of ‚0.1.4‘ reads as follows:
0 – No major version. There is no stable version yet. Development is still at an early stage.
1 – First minor version. This is software at an very early stage. Usually minor versions are compatible to the recent major release. Since no major version exists this software has no reliable behavior yet.
4 – There were four patches released for the first minor version. A patch is typically a bug fix that does not change the
The process of creating a new version is done as the following. (1) Define the next Version in a variable oi_version stored in a file VERSIONS. (2) Use a script bumpVersions.sh to update the version numbers in several files like README, manpage, etc. (3) Commit files that were updated with the new version number to git. (4) Use the mvn-gitflow plugin to create new versions for the actual source and to push everything in a well defined manner to github.
<plugin>
  <groupId>com.amashchenko.maven.plugin</groupId>
  <artifactId>gitflow-maven-plugin</artifactId>
  <version>1.7.0</version>
  <configuration>
    <gitFlowConfig>
        <developmentBranch>master</developmentBranch>
    </gitFlowConfig>
  </configuration>
</plugin>
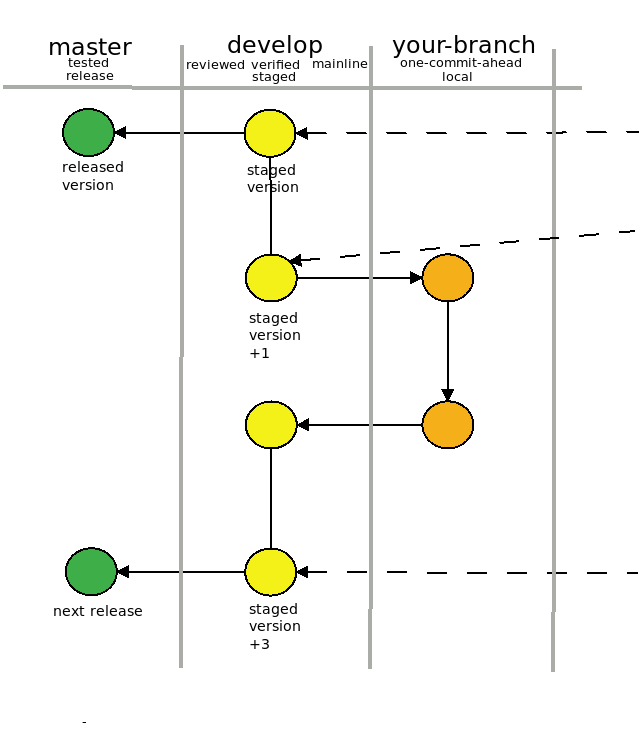
The gitflow-maven-plugin supports the command mvn gitflow:release . The command does the following:
1. Define a new release number
2. Update the pom.xml in the development branch accordingly
3. Push the updated pom.xml to the mainline branch
4. Create a tag on mainline
5. Update the release number in the development branch to a new SNAPSHOT release.
6. Push the updated pom.xml to the development branch.
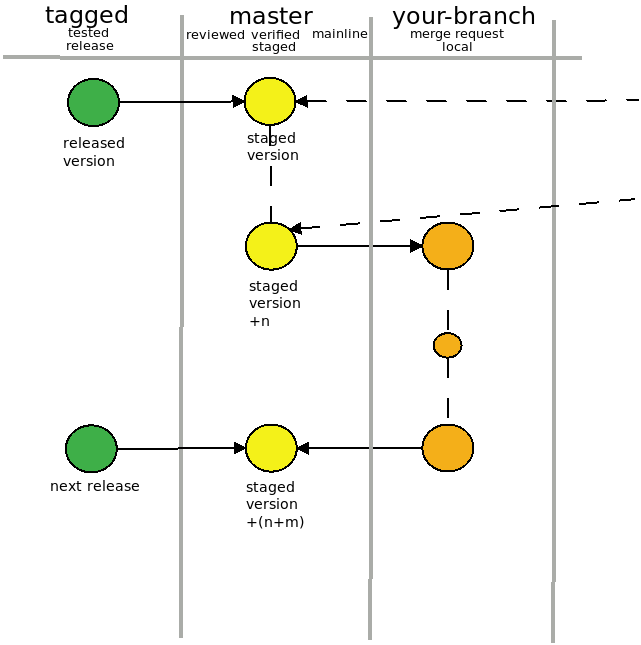
The plugin was originally created with for the `gitflow` branching approach. Since my project uses the github-flow-branching approach which does not foresee a development branch besides of the mainline I defined master as development branch.
Package everything together
At this point a new release of the sourcecode is online at github. Now, it’s time to create the binary release. The binary release will be a .deb file containing the newly packaged fat-jar together with the minimal jvm. (5) A build.sh script is used to create the .deb artifact.
#! /bin/bash

scriptdir="$( cd "$( dirname "${BASH_SOURCE[0]}" )" && pwd )"
cd $scriptdir
source VERSIONS
mvnparam=$1

function build_oi(){
 package_name=$1
 package_version=$2
 package=${package_name}_$package_version
 mkdir -p deb/$package/usr/lib
 mkdir -p deb/$package/usr/bin
 mkdir -p deb/$package/usr/share/man/man1/
 mvn package -D$mvnparam
 sudo cp src/main/resources/$package_name deb/$package/usr/bin
 sudo cp target/$package_name.jar deb/$package/usr/lib

docker build -t adopt_jdk_image -f Dockerfile.build .
docker create --name adopt_jdk_container adopt_jdk_image
docker cp adopt_jdk_container:/opt/jvm_for_oi deb/$package/usr/share/jvm_for_oi
docker rm adopt_jdk_container

ln -s ../share/jvm_for_oi/bin/java deb/$package/usr/bin/jvm_for_oi

}

function build(){
 package_name=$1
 package_version=$2
 package=${package_name}_$package_version

 if [ -d $scriptdir/man/$package_name ]
 then
   cd $scriptdir/man/$package_name
   asciidoctor -b manpage man.adoc
   cd -
   sudo cp $scriptdir/man/$package_name/$package_name.1 deb/$package/usr/share/man/man1/
 fi
 dpkg-deb --build deb/$package
}

build_oi oi $oi_version
What you can see from the listing is that the script creates a directory structure in accordance to the .deb package format. It also generates (1) the fat-jar, (2) the minimal jvm (3) a man page and (4) binds it all together with a dpkg-deb -build command
Provide the .deb package via an online repository
(6) The .deb artifact is then uploaded to a bintray repo using again a shell script
#! /bin/bash

scriptdir="$( cd "$( dirname "${BASH_SOURCE[0]}" )" && pwd )"
source VERSIONS

function push_to_bintray(){
cd $scriptdir
PACKAGE=$1
VERSION=$2
API_AUTH=$3
subject=jschnasse
repo=debian
filepath=${PACKAGE}_${VERSION}.deb
curl -u$API_AUTH -XPOST "https://bintray.com/api/v1/packages/$subject/$repo/" -d@bintray/${PACKAGE}/package.json -H"content-type:application/json"
curl -u$API_AUTH -XPOST "https://bintray.com/api/v1/packages/$subject/$repo/$PACKAGE/versions" -d@bintray/${PACKAGE}/version.json -H"content-type:application/json"
curl -u$API_AUTH -T deb/$filepath "https://bintray.com/api/v1/content/$subject/$repo/$PACKAGE/$VERSION/$filepath;deb_distribution=buster;deb_component=main;deb_architecture=all;publish=1;override=1;"
curl -u$API_AUTH -XPUT "https://bintray.com/api/ui/artifact/$subject/$repo/$filepath" -d'{"list_in_downloads":true}' -H"content-type:application/json"
cd -
}
apiauth=$1
push_to_bintray oi $oi_version $apiauth
push_to_bintray lscsv $lscsv_version $apiauth
push_to_bintray libprocname $libprocname_version $apiauth
The script makes use of a set of prepared json files to provide metadata for the package.
(7) The last step is now to visit the github wegpage an navigate to the tag that has been created at step (4). By adding a release name it will become visible as release at the landing page of the git repo.
Step 6 seems the most critical step since it updates the debian repo and makes the new version available to everyone. In between step 5 and step 6 some sort of testing should happen to ensure that the artifact is installable and does execute as expected. My plan is to utilize a set of docker files to test releases. A first attempt can be found here.
Fazit
The process of versioning consists of multiple steps. Most of the work can be automated. A semi automated process can be developed with little effort. To automate the whole process it is crucial to provide well thought tests in between the steps and to define fallback points. This adds some extra safety to the objective but also introduces extra complexity. For future jdk versions it could be beneficial to use jpackager instead of jlink.